
Lot 804 藏中 十二/十三世紀 釋迦牟尼銅像 | A LARGE COPPER ALLOY FIGURE OF SHAKYAMUNI BUDDHA
落槌价
预展中
成交价
预展中
| 拍卖公司 | 邦瀚斯 |
|---|---|
| 拍卖时间 | 2026年10月29日 |
拍品信息
拍品名称
藏中 十二/十三世紀 釋迦牟尼銅像 | A LARGE COPPER ALLOY FIGURE OF SHAKYAMUNI BUDDHA
年代
CENTRAL TIBET, 12TH/13TH CENTURY
起拍价
HKD 4,500,000
估值区间
HKD 4500000 - 6500000
尺寸
未知
品相
未知
更多信息
CENTRAL TIBET, 12TH/13TH CENTURY
Himalayan Art Resources item no. 8866
62 cm (24 3/8 in.) high
Footnotes
藏中 十二/十三世紀 釋迦牟尼銅像
Published
Mehmet Hassan Asian Art, The Art of Central Asia, China and Tibet, March 2005.
Advertisement, Mehmet Hassan Asian Art, Orientations, April 2003, Vol. 34, No. 4, p. 13.
Provenance
Collection Mr. M Hassan, 1994-2015
Marcel Nies Oriental Art, Antwerp
Acquired from the above at TEFAF Maastricht, March 2015
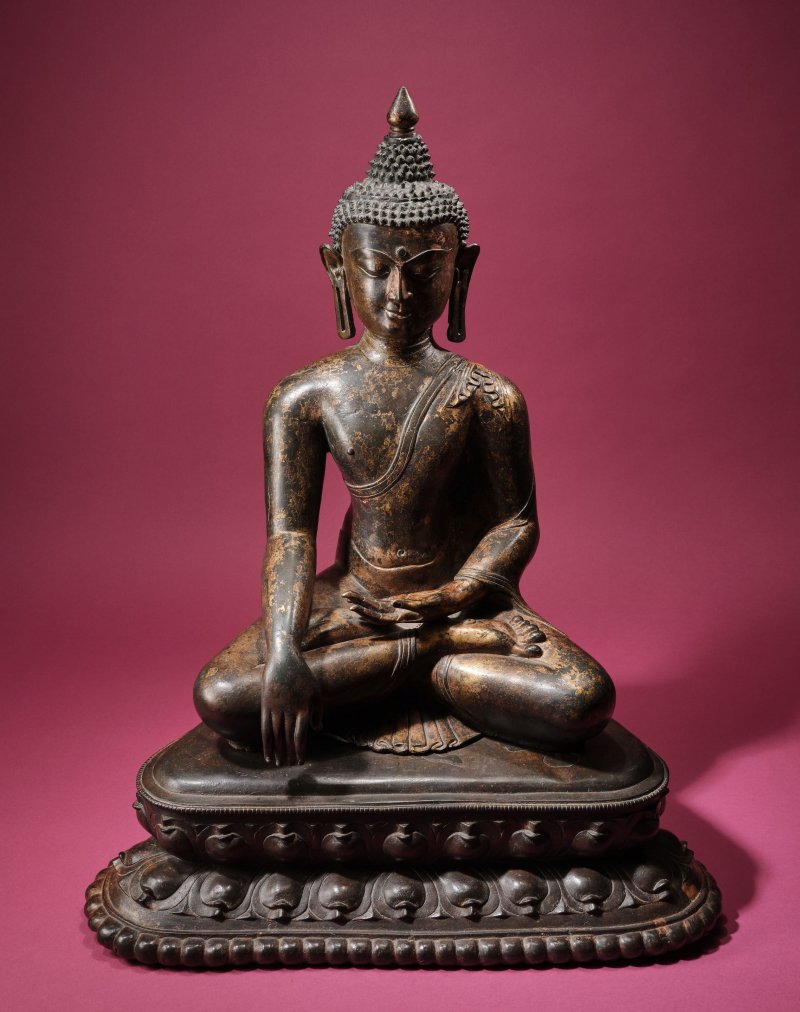
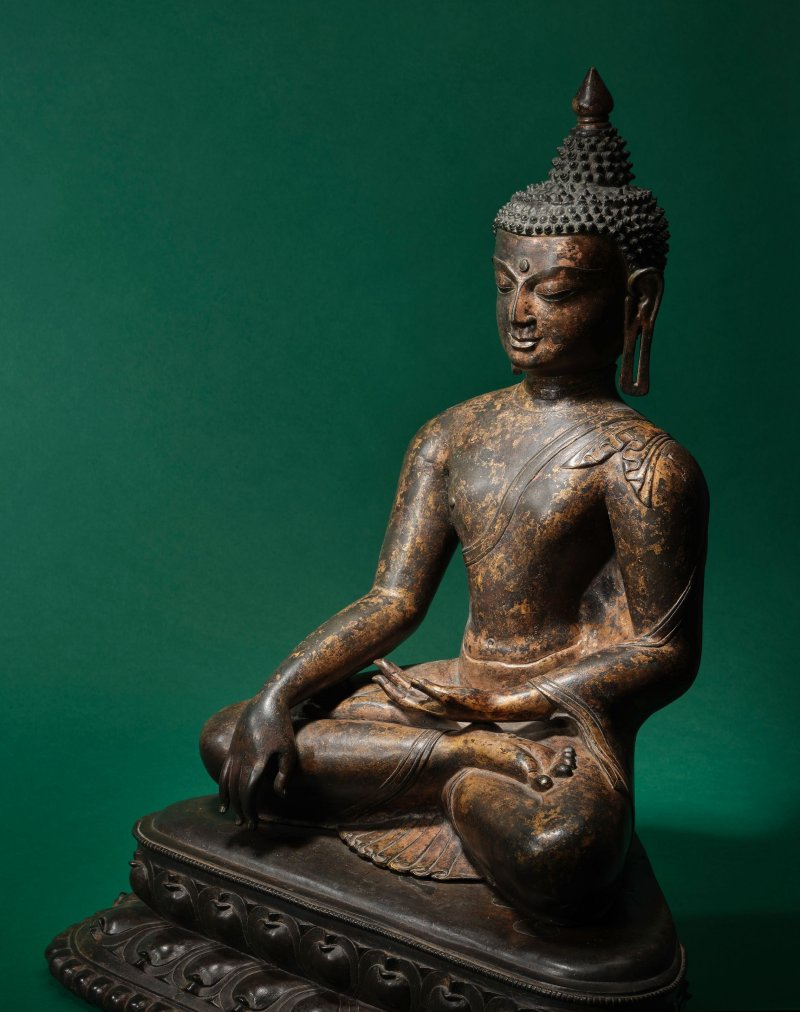
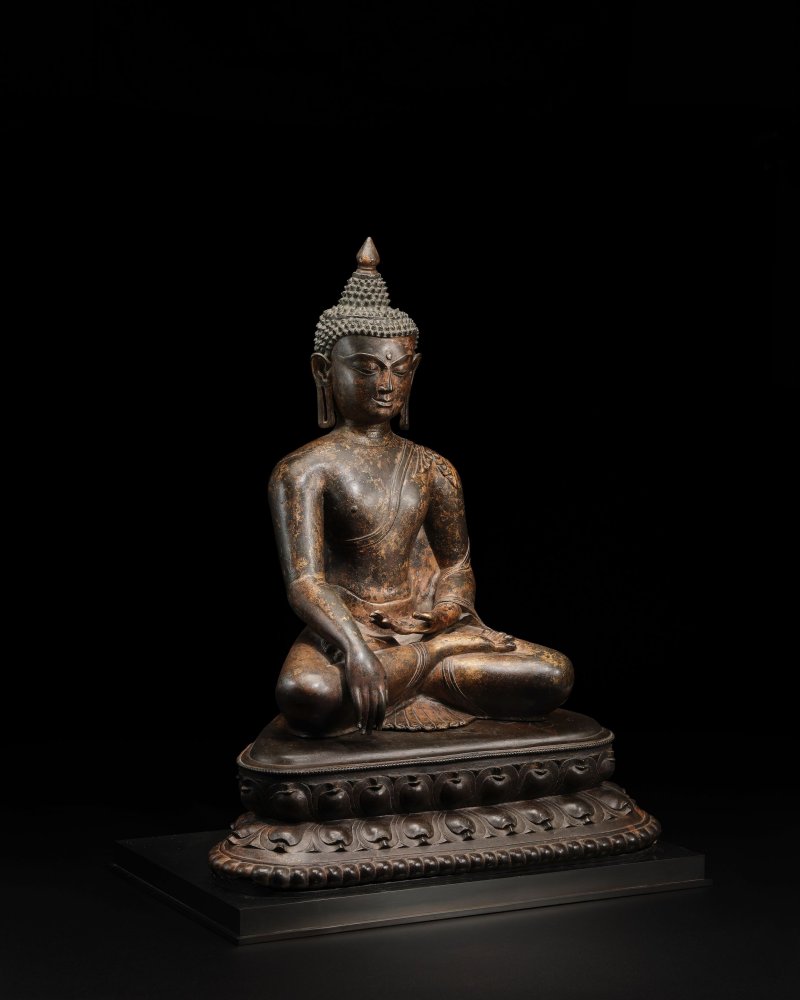
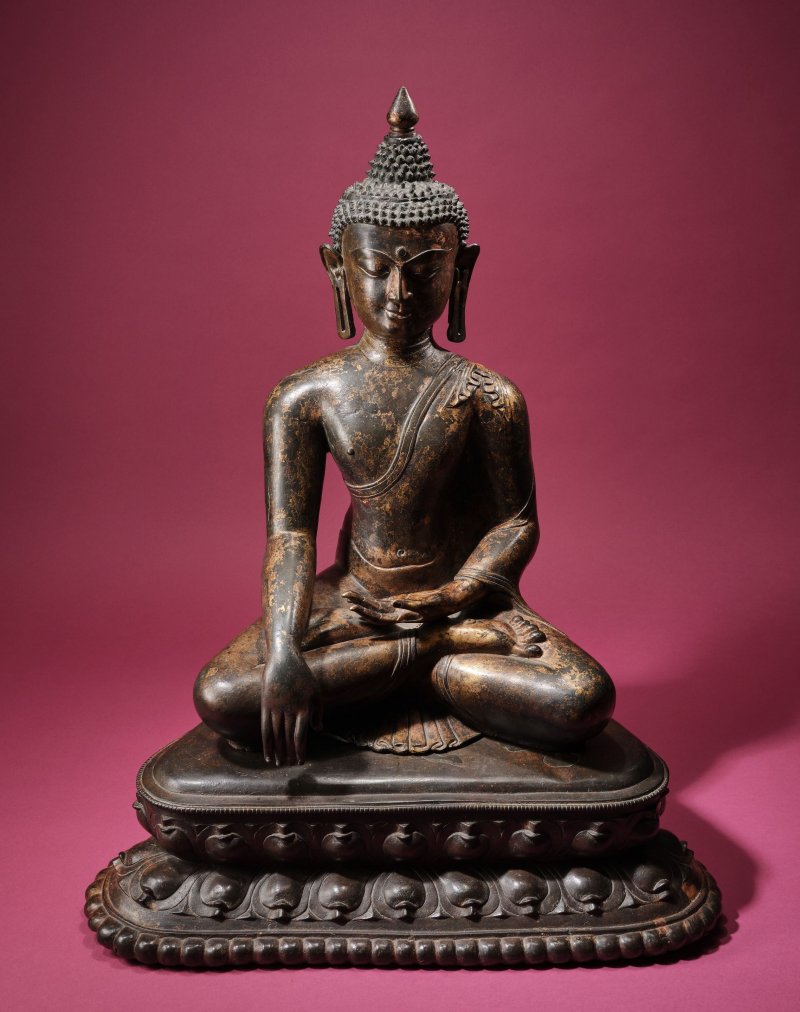
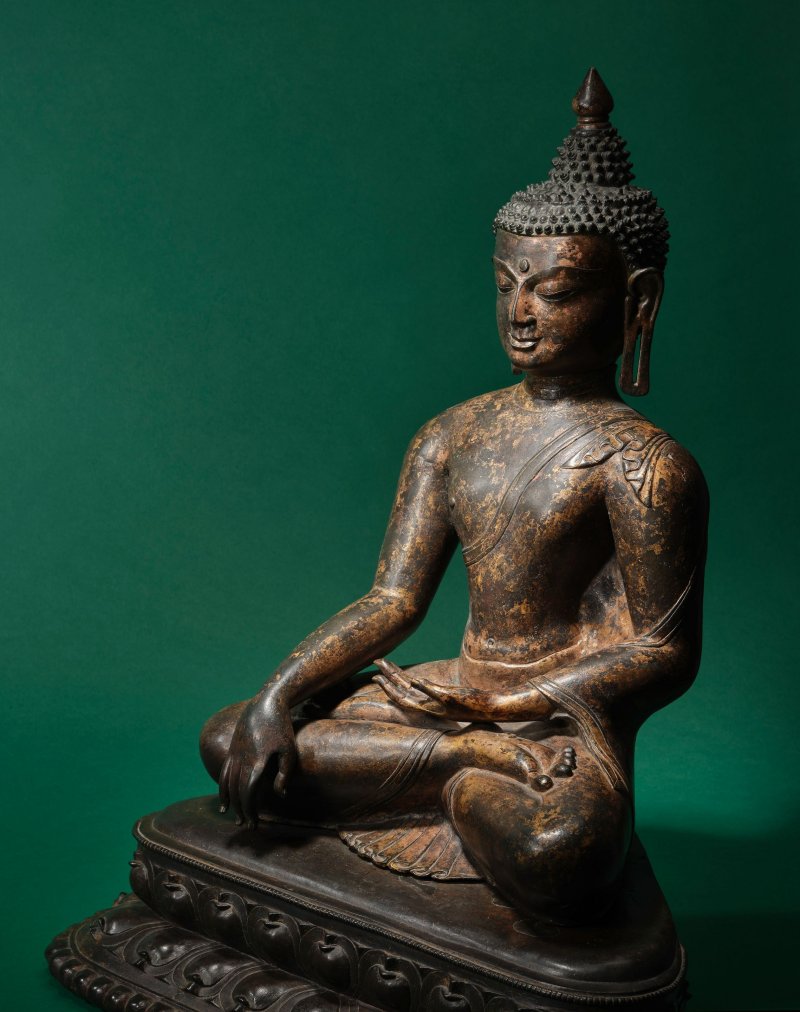
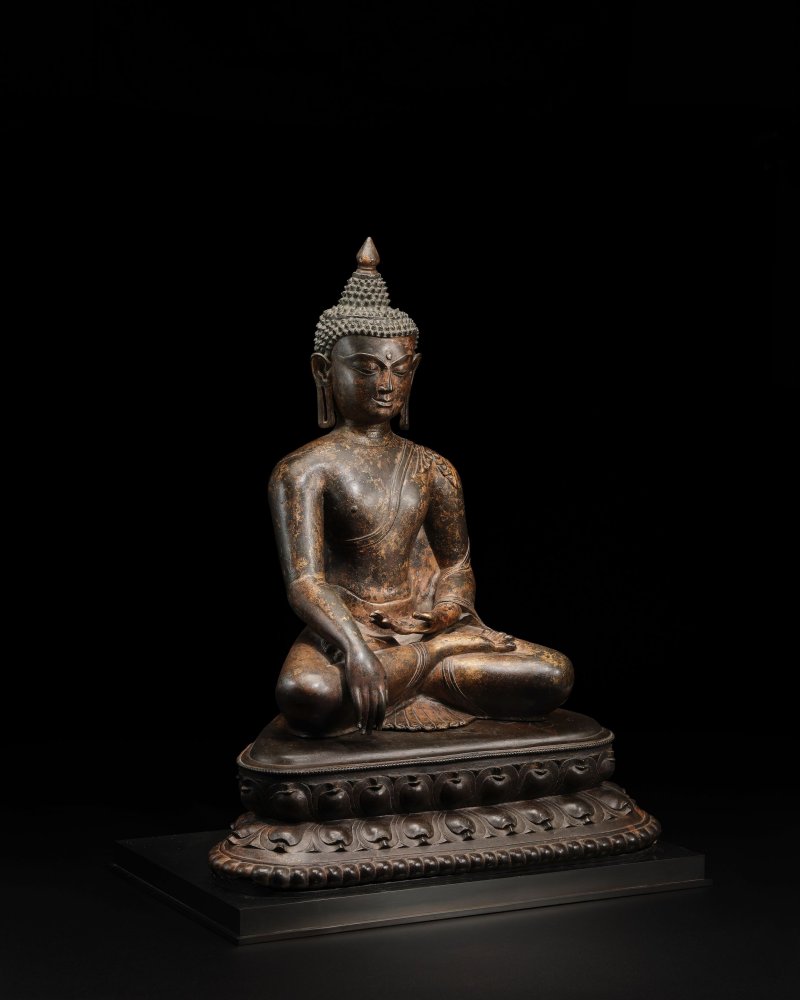
This large sculpture shows the important moment when Shakyamuni Buddha attained full enlightenment (bodhi, "awakening") beneath the Bodhi Tree at Bodhgaya. It is one of the most significant and popular representations of Shakyamuni and serves not only as an image of a historical event but also as a symbol of the path to enlightenment itself. The unusually large size of the sculpture, which is rare for Tibetan bronze works, lends the moment an especially powerful and monumental presence.
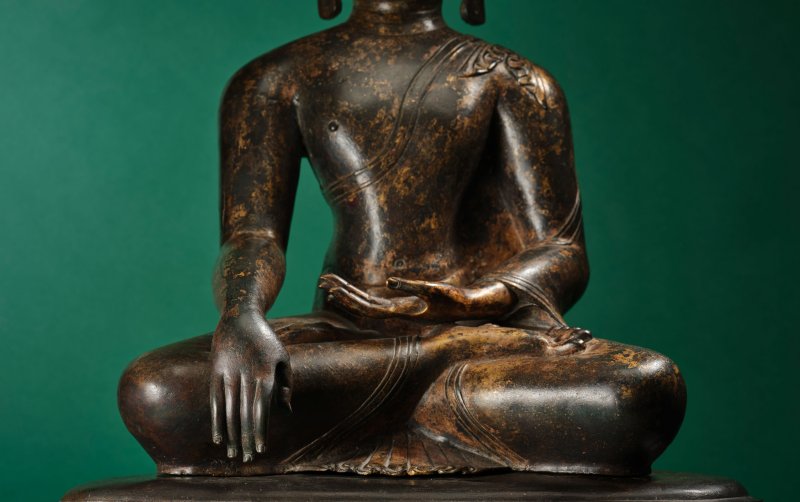
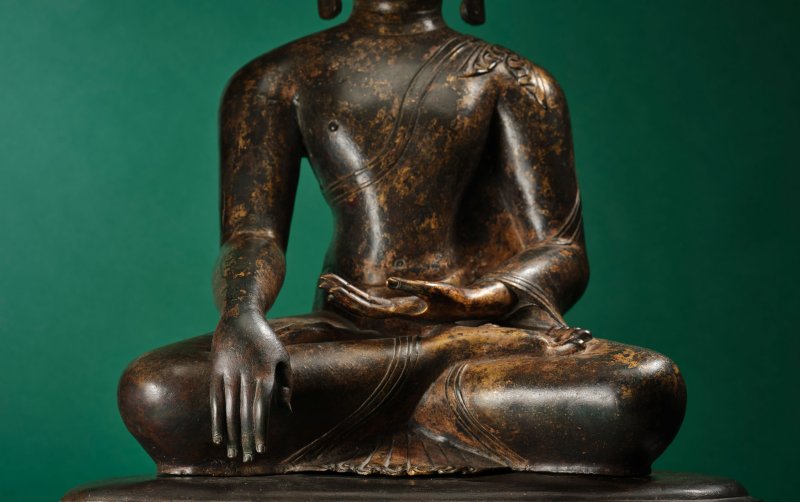
According to tradition, Shakyamuni sat meditating beneath the Bodhi Tree and refused to move until he achieved enlightenment. Mara, the embodiment of ego, delusion, and desire that bind beings to the cycle of death and rebirth, attempted to prevent this by questioning whether Shakyamuni was worthy of becoming a Buddha. In response, Shakyamuni touched the ground with his right hand in the gesture known as the , or "earth-touching gesture," and called upon the Earth Goddess to witness the many virtuous deeds he had performed throughout his previous lives. This proved his worthiness, and Mara and his followers were dispelled.
Shakyamuni was then able to complete his meditation and attain enlightenment. This moment, known as , or the "Victory over Mara," became a highly popular subject and one of the most important devotional images in Buddhist art. The calm expression of the Buddha reflects the peace and liberation he achieved through enlightenment. The image is intended as an aid to contemplation, encouraging devotees to reflect upon their own spiritual efforts and follow the Buddha's example. The sculpture has a strong and solid appearance. The broad chest, rounded shoulders, and firmly modelled features convey a sense of strength and authority. At the same time, the face is calm and balanced. The gently curved eyebrows and lowered eyes suggest deep meditation, while the soft cheeks and full lips create a peaceful expression. The long earlobes remind us that the Buddha once lived as a prince and wore heavy jewellery, which he later renounced. The simple monastic robe also symbolizes his rejection of worldly life. The , representing wisdom and enlightenment, rises prominently from the top of his head and is surmounted by a bud-like or jewel-shaped finial.
The lotus pedestal is formed with remarkable naturalism. Its double-lotus base with a beaded border features crisply modelled petals in high relief: the inner petals are bulbous and sculptural, their tips curling upward with lively definition, while the broader outer petals are framed by finely incised borders that lend the base a sense of precision and elegance.
Stylistically, the sculpture reflects the cultural and artistic exchanges between Kashmiri and Pala Buddhist sculpture of the 10th and 11th centuries. These traditions are here developed into a fresh interpretation with a distinctly Tibetan character. During the eleventh century, the Indian master Atisha (980–1054) travelled to Western Tibet, where his teachings contributed significantly to the revival of Buddhist doctrine and monastic organisation, a period known as the Second Diffusion of Buddhism. This resulted in a flourishing of Buddhist institutions and artistic activity, stimulating the production of religious imagery. Tibetan rulers and monasteries commissioned Kashmiri metalworkers and encouraged the movement of artists, patrons, and artistic ideas between northeastern India, Kashmir and Tibet.
The Pala influence is particularly notable in the treatment of the diaphanous monastic robe, with its characteristic "fishtail" fold cascading over the left shoulder, together with the tightly arranged curls of the hair. Comparable features can be seen in a 9th- or 10th-century Pala-period stone Buddha in the collection of the Asian Art Museum, San Francisco (B60S123+; fig. 1). The fleshy and graceful modelling of the right hand also recalls imagery from Kashmir, see an 8th century Buddha in the Norton Simon Museum (F.1972.48.2.S).
Following the decline of the great Buddhist institutions in northeastern India in the late 12th and early 13th centuries, artistic traditions associated with the Pala style continued to flourish in Tibet and Nepal. Nepalese Buddha images often demonstrate a closer stylistic relationship to Indian prototypes, as seen in a 13th-century example in the collection of the Norton Simon Museum (M.73.2.S), published in von Schroeder, (1981, no. 87C, p. 342).
While indebted to Kashmiri and Pala models, the present sculpture ultimately departs from both traditions through its more robust modelling, broad facial features, and powerful physical presence. Compare to another large-scale Buddha published in von Schroeder, , Vol. II, pp. 1188-1189, pl. 321F (fig. 2). These qualities impart a monumentality and strength that are distinctly Tibetan, transforming inherited artistic conventions into an original and compelling expression of Tibetan Buddhist sculpture.
For the figures listed in this essay, please refer to our printed or digital catalogue.
Himalayan Art Resources item no. 8866
62 cm (24 3/8 in.) high
Footnotes
藏中 十二/十三世紀 釋迦牟尼銅像
Published
Mehmet Hassan Asian Art, The Art of Central Asia, China and Tibet, March 2005.
Advertisement, Mehmet Hassan Asian Art, Orientations, April 2003, Vol. 34, No. 4, p. 13.
Provenance
Collection Mr. M Hassan, 1994-2015
Marcel Nies Oriental Art, Antwerp
Acquired from the above at TEFAF Maastricht, March 2015
This large sculpture shows the important moment when Shakyamuni Buddha attained full enlightenment (bodhi, "awakening") beneath the Bodhi Tree at Bodhgaya. It is one of the most significant and popular representations of Shakyamuni and serves not only as an image of a historical event but also as a symbol of the path to enlightenment itself. The unusually large size of the sculpture, which is rare for Tibetan bronze works, lends the moment an especially powerful and monumental presence.
According to tradition, Shakyamuni sat meditating beneath the Bodhi Tree and refused to move until he achieved enlightenment. Mara, the embodiment of ego, delusion, and desire that bind beings to the cycle of death and rebirth, attempted to prevent this by questioning whether Shakyamuni was worthy of becoming a Buddha. In response, Shakyamuni touched the ground with his right hand in the gesture known as the , or "earth-touching gesture," and called upon the Earth Goddess to witness the many virtuous deeds he had performed throughout his previous lives. This proved his worthiness, and Mara and his followers were dispelled.
Shakyamuni was then able to complete his meditation and attain enlightenment. This moment, known as , or the "Victory over Mara," became a highly popular subject and one of the most important devotional images in Buddhist art. The calm expression of the Buddha reflects the peace and liberation he achieved through enlightenment. The image is intended as an aid to contemplation, encouraging devotees to reflect upon their own spiritual efforts and follow the Buddha's example. The sculpture has a strong and solid appearance. The broad chest, rounded shoulders, and firmly modelled features convey a sense of strength and authority. At the same time, the face is calm and balanced. The gently curved eyebrows and lowered eyes suggest deep meditation, while the soft cheeks and full lips create a peaceful expression. The long earlobes remind us that the Buddha once lived as a prince and wore heavy jewellery, which he later renounced. The simple monastic robe also symbolizes his rejection of worldly life. The , representing wisdom and enlightenment, rises prominently from the top of his head and is surmounted by a bud-like or jewel-shaped finial.
The lotus pedestal is formed with remarkable naturalism. Its double-lotus base with a beaded border features crisply modelled petals in high relief: the inner petals are bulbous and sculptural, their tips curling upward with lively definition, while the broader outer petals are framed by finely incised borders that lend the base a sense of precision and elegance.
Stylistically, the sculpture reflects the cultural and artistic exchanges between Kashmiri and Pala Buddhist sculpture of the 10th and 11th centuries. These traditions are here developed into a fresh interpretation with a distinctly Tibetan character. During the eleventh century, the Indian master Atisha (980–1054) travelled to Western Tibet, where his teachings contributed significantly to the revival of Buddhist doctrine and monastic organisation, a period known as the Second Diffusion of Buddhism. This resulted in a flourishing of Buddhist institutions and artistic activity, stimulating the production of religious imagery. Tibetan rulers and monasteries commissioned Kashmiri metalworkers and encouraged the movement of artists, patrons, and artistic ideas between northeastern India, Kashmir and Tibet.
The Pala influence is particularly notable in the treatment of the diaphanous monastic robe, with its characteristic "fishtail" fold cascading over the left shoulder, together with the tightly arranged curls of the hair. Comparable features can be seen in a 9th- or 10th-century Pala-period stone Buddha in the collection of the Asian Art Museum, San Francisco (B60S123+; fig. 1). The fleshy and graceful modelling of the right hand also recalls imagery from Kashmir, see an 8th century Buddha in the Norton Simon Museum (F.1972.48.2.S).
Following the decline of the great Buddhist institutions in northeastern India in the late 12th and early 13th centuries, artistic traditions associated with the Pala style continued to flourish in Tibet and Nepal. Nepalese Buddha images often demonstrate a closer stylistic relationship to Indian prototypes, as seen in a 13th-century example in the collection of the Norton Simon Museum (M.73.2.S), published in von Schroeder, (1981, no. 87C, p. 342).
While indebted to Kashmiri and Pala models, the present sculpture ultimately departs from both traditions through its more robust modelling, broad facial features, and powerful physical presence. Compare to another large-scale Buddha published in von Schroeder, , Vol. II, pp. 1188-1189, pl. 321F (fig. 2). These qualities impart a monumentality and strength that are distinctly Tibetan, transforming inherited artistic conventions into an original and compelling expression of Tibetan Buddhist sculpture.
For the figures listed in this essay, please refer to our printed or digital catalogue.
常见问题
这件藏中 十二/十三世紀 釋迦牟尼銅像 | A LARGE COPPER ALLOY FIGURE OF SHAKYAMUNI BUDDHA的成交价是多少?
落槌价为 预展中。 成交价为 预展中。